Thursday, November 4, 2010

In Kodachrome: Baby Animals at the Texas State Fair

Well how about I actually post some photos for a change. These are baby animals at the Texas State Fair. All photos taken with my Voigtlander Bessa R3a, Voigtlander Nokton 50mm f/1.5, on Kodachrome 64.  I have 2 months to shoot my remaining 3 rolls of Kodachrome 64.

Baby Zebra
Baby Zebra


Shetland Pony:
Baby Pony

Baby Goat:
Baby Goat

Baby Kangaroo
Baby Kangaroo

A 1200 lb pig:
One Fat Pig

The little farm kids showing their animals:
Showing Animals

Baby Camels:
Baby Camels

Baby Goats:
Baby Goats

Fuzzy Llama:
Baby llama

Saturday, October 23, 2010

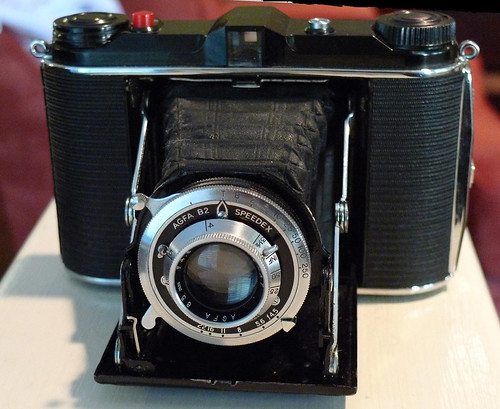
Ansco B2 Speedex Review & Results

The B2 Speedex was made in Binghamton, New York by Agfa Ansco. It is very similar to early Agfa Isolette cameras and it was made around 1940. "B2" is what Agfa called 120 film back in the day.

Shutter: It has an unmarked shutter, which features shutter speeds of B, T, 2, 5, 10, 25, 50, 100, 250. It is rather uncommon for a shutter not to be separately marked. Common shutters were Vario, Klio , Prontor, and Compur.  The earlier Compur shutter had the same shutter speeds as this Speedex.

Lens: The 85mm f/4.5 Agfa Anastigmat lens is also a bit of a mystery. Agfa marketed the Agnar (3 element), Apotar (better 3 element) and Solinar (4 element).  I've seen a very similar looking Isolette on eBay with a 85mm f/4.5 Solinar lens. Cheaper leneses were normally attached to cheaper shutters, so it can't be the bottom level lens. However, "Anastigmat" is normally a label I see attached to three element lenses. (he agrees: What the Heck is an Anastigmat).  My guess is that is like an Apotar.

Operation: Body shutter, which I like. No double exposure prevention which I like. No depth of field scale, which I find especially annoying on a scale focus camera. Like most folders, you have to look through the little red window when advancing film.

Condition and Repairs: The bellows, like all Agfa folders, were full of pinhole leaks. Some of these are hard to see without a very powerful flashlight.  I first attempted to patch the bellows with some RTV black silicone. This is a good solution for a bellows with a couple of holes, but these bellows were littered with pinholes, so I decided to replace the bellows. I bought the new bellows from Workmans Photography. The slow speeds (2, 5) stick, but I don't plan on doing anything about it.The lens has a few internal spots, so I'd give a 7.5/10 rating.

Camera (with the old bellows):
Agfa Ansco Speedex B2

Results:
The results are quite positive, but it can be difficult to guess distances. It's not too bad at f/16 due to the wide depth of field, but I wouldn't want to try at f/4.5 except at infiniti. I expected the camera to perform well at f/8-f/16, but I didn't really have an opportunity for a test a f/4.5, so until next roll. 

At f/8. No flash sync, so I manually tripped the flash, with the shutter open. Notice the black in the lower right. That's because of my B+ job in replacing the bellows. That piece stuck into the frame.It is on all photos, just cropped out of others.


At f/16, 6.5 feet:

Double exposure at: f/22 Double exposures are easy, because all you have to do is recock the shutter. Camera manufacturer's later added mechanisms that prevents double exposure. This was for the benefit of most consumers at the time, but it prevents experimentation today.

Friday, October 22, 2010

Medium Format Folders

Why Own?
I find something intriguing about medium format folding cameras. I think it is due to the combination of larger MF negatives, pocketability, simplicity, and relatively low cost. Medium format folding cameras were popular from the 1930s to the 1950s.

If someone doesn't own a medium format camera, they are cheap way to get into it. Compared to a Lomo camera, even the simplest folders have a triplet lens (versus single element plastic lenses), 3 more shutter speeds, and an adjustable aperature that is 2-3 stops faster at its widest.

What Drives Price
Camera collectors can radically change the price of seemingly similar cameras. However, there are distinct differences that can change the price from $10 to $400.
  1. Number of lens elements: Cameras with 4-element lenses such Zeiss Tessar, Voigtlander Skopar, or Agfa Solinar command substantial premiums. Most folders tend to have lenses that are in the style of a Cooke Triplet, such Agnar, Apotar, Voigtar, Vaskar, Novar, Nettar, or Radionar. They often have the word Anastigmat after the name. They are not bad lenses and offer similar performance at apertures f/8 and smaller. Voigtlander equipped some of its folders with 5 element Heliar lenses - very expensive
  2. Lens coating: Post-war lenses are coated which helps reduce flare and increase contrast. This is nice feature, but it doesn't mean uncoated lenses are dogs. To the collector, a coated 4 element lens command a significant premium.
  3. Shutter: Better shutter offer more shutter speeds and flash synchronization. The grand poobah of shutters is the Synchro-Compur with a top speed of 500 and a flash synchronization. Earlier Compur and Compur Rapid shutter are quality shutters. Prontor made a line of quality shutter that are just behind the Compur is quality, but still highly useable. Vario shutters were some of the simpler shutters with three shutter speed plus bulb. Tempor shutters are East German versions of the Compur. I have difficulty trusting the quality of the Eastern Bloc camera equipment.
  4. Rangefinder: Rangefinders help focus the camera. Without one, you have to guess the distance to your subject. Rangefinders that can be coupled or uncoupled. With an uncoupled rangefinder, you use the rangefinder to determine the distance, then manually set the distance on the focussing ring. There are few folders with coupled rangefinders and these command the highest prices. Models with uncoupled rangefinders also command premiums.
  5. Condition: Besides cosmetic condition, old cameras can get problems: Slow speeds on the shutters can stick, lenses can get cloudy or get fungus. One of the prime areas where folders can get problems is their bellows. Almost every Agfa or Ansco model needs new bellows because the material they used was subpar. They develop pinhole leaks, so you can see by plain visual inspection. I shine a high powered flashlight into the back of the camera.
  6. Format: Folders that use 120 film shoot one of three formats: 6x4.5, 6x6, 6x9. Price doesn't vary greatly between models, but 6x6 format is the most common, so the most bargain finds will be here.
  7. Oddities: Collectors go for various ancillary things that have no bearing on how a camera performs, such as the original box, or a MIOJ stamp (Made in Occupied Japan),.
Recommendation
If I had to recommend one for someone looking for a folder without wanting to commit much money, it would be one of the post-war Zeiss Nettar. Zeiss has the best reputation for build quality and their bellows are typically still light tight.. They typically go for $20-$25. Zeiss had a million different models, so a picture is worth 1,000 words:

Manufacturers:
  • Zeiss made a full line of Nettar and Ikonta models starting in the early 1930s.
  • Agfa made a range of Isolette cameras. Ansco had a JV with Agfa and had nearly identical cameras branded Speedex.
  • Welta is less known but made good cameras. The Perle is 645 and the Weltax is a 6x6. The Weltur came in 6x9 or 6x6 versions. The big advantage is that it is unit focusing, means that the whole lens moves to focus, not just the front element which is common to most folders.
  • Voigtlander was another major manufacturer. Perkeo was the 6x6 and the Bessa is a 6x9. There was also a Bessa 6x6.
  • Certa, Balda, Ensign, Franka, and Dacora were other European companies that made reasonably quality folding cameras
  • Kodak made a lot of folding cameras, but Kodak has a reputation for making junky cameras, withstanding their Retina line (which was made by Nagel). A lot of Kodak folding cameras also use film that is no longer available, such as 620 or 116.
My cameras:
Zeiss Ikonta 524/2: It's a 6x9 from the early-mid 1950s, with a Synchro-Compur shutter and a coated 105/3.5 Tessar lens, and an uncoupled rangefinder. I upgrade to this from the very capable Ikonta 523/2 (added the uncoupled rangefinder).


Zeiss Ikonta 523/16 with a Synchro-Compur shutter and a 75/3.5 Tessar lens.


Ansco Speedex B2. This is a 6x6 from about 1940, with an uncoated Agfa (triplet) 85/4.5 lens with an unnamed shutter, but it has 7 speeds, similar to a Compur.


Zeiss Ikonta 520 A. It is a 6x4.5 camera from 1933 or 1934. It has an uncoated 70/3.5 Tessar with a Compur shutter


Links

Price List - Post 1950, Zeiss Ikon 120 Folders


Zeiss Ikonta 523/2 Reviewed


Zeiss Ikonta 524/2 Reviewed

Agfa Ansco B2 Speedex Reviewed

Tuesday, October 12, 2010

TDC Stereo Colorist II Review

The TDC Colorist II:. As other sites will tell you, the TDC Colorist II was made in Germany by Bodensee Kamerawerke for Three Dimension Company, a subsidiary of Bell & Howell.


Pros:
  • The top viewfinder is natural. Almost every camera on Earth has a viewfinder on top of the camera, except the Stereo Realist, which has a bottom viewfinder which is awkward to use.
  • While the viewfinder is small by today's standards, it's acceptable. There isn't much difference from one 50s era stereo camera to the other, regarding the size of the viewfinder
  • The focus, shutter speed and aperature are in logical places. I can focus the camera easily when holding it up to take photo.
  • Focusing is easy because the RF patch is big and visible.
  • It has a standard hot shoe, which allows for easy use of flash
  • The camera has 35mm f/3.5 Rodenstock Trinar lenses. It produces very sharp results stopped down and good results at wider apertures. However the benefits of stereo come into play with a when the whole image is in focus, so performance at wider apertures is less relevant.

Cons: 
  • The body seems combersome to hold, because of its thickness.
  • You need to have film in the camera (or manually wind the sprockets to the left of the takeup spool) in order  to wind the shutter.

Results:

I've only taken two rolls so far, but I've been pleased with the results. It's hard to review the combined results of a stereo image on the net.

The biggest challenge is managing depth of field, but this will be consistent across all stereo cameras.  Stereo pictures look best when objects are in focus, and objects are at different depths. If you purely use the rangefinder, it can be hard to have both someone close and background in focus. You can use the rangefinder to determine distance to your subject but then use depth of field scales to increase your total dof. For example, if with the 35mm lens at f/8, if you focus on your subject 7 feet away, you have dof between 5 and 12 feet. If you then change your focus to 12 feet away, your depth of field will be between 7 feet at 40 feet, allowing for greater background sharpness.

Elite Chrome 200:
Both photos at f/16


Below photos are Kodachrome 64.
At f/11 or f/16. Ignore the movement of the baby's head, there is a lot of sharp detail:
25Sep - KR - Colorist 004a

Probably around f/8:
Stereo Colorist

Probably around f/5.6, with fill flash:
25Sep - KR - Colorist 027b

Monday, July 19, 2010

Stereo Cameras

There seems to be a serious lack of information on stereo cameras on the internet. There is a lot of technical information available, but little discussion about the pros and cons each and how most cameras have held up over time.

Here are some sites that are out there already:

Stereoscopy.com has a lot of technical information, but no opinions or discussion about pros and cons.
Photo-3d.com has pictures but no reviews.
This site discusses different types of stereo photography. I am focused on a twin lens camera.
This site has a few reviews, though the picture links are broken.
The Rise of the Stereo Realist - is in the mold of the type of site I was looking for.

Here is what I've been able to learn:
  1. Kodak Stereo - Most have shutter problems - the speeds stick and even when working the two shutters can fire at different speeds, producing
  2. Realist 3.5 - This I've actually held. Seems ergonomically weird. The viewfinder is on the bottom, the focus dial is on the side and the shutter release is on the top. The Realist 2.8 was essentially the same camera with better lenses.
  3. Realist 45 (or Iloca Stereo Rapid) - Supposedly easy to use but no rangefinder. Bottom viewfinder.
  4. Revere 33 - Has a bubble level in the viewfinder, but the viewfinder is apparently small and the rangefinder is seperate. Supposedly the hotshoe is "not standard." I've seen it described both as delicate and built like a tank. Perhaps the external is solid, but the internals are delicate?
  5. Wollensak 10 - A upmarket Revere 33 with top quality lenses.
  6. Stereo Graphic - Two shutter speeds and fixed focus.
  7. TDC Colorist II - Normal hotshoe and integrated rangefinder, but no bubble level. Aperture grease can supposedly get gunked up. The Colorist I has no rangefinder.
  8. Wirgin Stereo (Edixa IA) - No rangefinder and cold shoe. Issues with light leaks have been mentioned.

Based on what I've seen, I've narrowed it down to the Revere 33 or the Colorist II. Both have 35/3.5, 3 element Cooke-triplet lenses:  Revere's Wollensack Amaton and the Colorist's Rodenstock Trinar lenses. I'm not sure if one is better than the other. Both were good brands.


Saturday, July 10, 2010

Price List - Post 1950, Zeiss Ikon 120 Folders

I like the Zeiss line of folders because their bellows tend to be still light tight, unlike the Agfa ones. The models below are the later models produced after 1950, where the viewfinder is integral to the top plate: so they all basically look like the photo below. The advantage that these have is that it has an accessory shoe, so you can mount an external rangefinder and/or a light meter.


The body of the cameras are the same, while the difference is the lens/shutter combination. The Novar is a 3-element lens, while the Tessar has 4 elements. All have coated lenses.

Models that have a number XXX/2 are 6x9 format, while XXX/16 are 6x6. I don't know why

Nettar - The least expensive model came with a 4 speed Vario shutter and a Novar f/6.3. Other slightly more expensive models came with a 6 speed Pronto shutter and a Novar f/4.5.
Ikonta and Ikonta M - The Ikonta M had a uncoupled rangefinder, while others are scale focus only. Ikontas with Novars were often places with Prontor-S shutters while Tessars had Compur-Rapid shutters. The primary difference is that the Compur has a top shutter speed of 1/500, while the Prontor has a top speed of 1/250.

The prices are sourced from eBay auctions and Classified sales. One thing to note is that an eBay sale price is the price willing to be paid by the second bidder. If someone bids the $100 and I win with a $150 bid, my sale price is $101, but in actuality, the value of the item is the price I would be willing to pay ($150).

Updated (Nov 2, 2010)

6x9:
Nettar 517/2 with Novar 105/6.3 - $35
Ikonta 523/2 with Novar 105/3.5 - $80
Ikonta 523/2 with Tessar 105/3.5 - $210
Ikonta M 524/2 with Novar 105/3.5 $115-$130
Ikonta M 524/2 with Tessar 105/3.5 - $230 - $420

6x6:
Nettar 517/16 with Novar 75/6.3 - $20-$25
Nettar 518/16 with Novar 75/4.5 - $20-$30
Ikonta 523/16 with Novar 75/3.5 - $50
Ikonta 523/16 with Tessar 75/3.5 - $110
Ikonta M 524/16 with Novar 75/3.5 - $75 - $185
Ikonta M 524/16 with Tessar 75/3.5 - $250

Super Ikonta III (531/16) (6x6 coupled RF) with Novar 75/3.5 -  $125-$150
Super Ikonta III (531/16) (6x6 coupled RF) with Tessar 75/3.5 - $275-$300

Saturday, May 29, 2010

Developing Your Own Black and White Film

Preparation:
I use a changing bag to load the film into the canister. Getting a large bag makes life easier.

Preparing solution:

D76: I mix stock solution from the powder a day or so before I need to use it. You need to mix it at 120 F so it I prefer to let it cool off on its own a bit. Stock solution keeps for a couple months. A 1L packet makes 33.8 oz and I use 8 oz of develop at a time, so I basically get four uses per packet.

HC-110 concentrate: I put the few drops into a bottle and mix it with a bit of hot water at the time of development.

From the D76 stock or HC-110 mixture, I pour into a graduated cylinder. I add water up to about 12-14 oz and then measure temperature. This leaves me with ability to add ice or hot water to get the temperature to what i need it.

For developing, I either use D-76 1:1 (stock plus equal parts water) or

HC-110 Dilution B, which is 15ml in the aggregate 480ml (16 oz) solution
HC-110 Dilution H, which is 7.5ml in the aggregate 480ml (16 oz) solution. Might as well save money!

Developing
Some people "pre-wash" - basically soak the film in water and agitate for a couple minutes before developing. The need or benefit disputed, but it is claimed to prevent air bubbles. The effect on developing times is unclear: it may lengthen developing times (more diluted since water remains) or shorten developing times (more effective when wet) I skip this step and having noticed anything wrong.

Agitation during developing
After I pour in the developer, I agitate for 30 seconds to start and then agitate for about 7 seconds every minute. Kodak recommends 5 seconds every 30 seconds, but that seems like I'm constantly agitating and usually I am trying to do two things at once. There is professional justification for less agitiation. Someone else smart than me explains:
Allowing the developer to "soak" for 1 minute between agitation does something very simple: it creates what are called edge and adjacency effects, which is sort of like a type of "edge sharpening". Here's how it works: the developer exhausts itself as it develops the highlight areas,which have been heavily exposed. The less-exposed shadow areas though, exhaust the developer significantly LESS, due to their lower exposure. This means that the developer, as it soaks and gets exhausted, develops the edge transitions between highlights and shadows, creating microscopic "edge" enhancements at the "adjacent" areas between shadows and highlights. This exhausted developer/stronger developer edge and adjacency effect is made more pronounced by a longer soak time: if the developer is agitated every 30 seconds, fresh developer is more or less continually distributed,and the edge and adjacency effects do not develop to nearly the same degree.
Developing Time
Tri-X 400 at ISO 400
  • D-76 1:1 - 68F: 9 3/4 minutes , 70F: 9 minutes
  • HC-110 Dilution H - 68F: 13 minutes

Tri-X 400 at ISO 1600
  • HC-110 Dilution B - 68F: 13.5 minutes

TMax 3200
  • HC-110 Dilution B - 68F: 8.5 minutes

To adjust time for developing following this formula (where Exp = e^x):
New time = Old time × exp(-0.045 × (New temp °F - Old temp °F))

Stop Bath
Kodak makes stop bath to immediately stop development. Pour out the develop and adding a lot of water will do the same thing. Stop bath is claimed to save fixer life. It's pretty cheap, but it smells nasty. I tend avoid it because of the smell and I'd rather risk getting less chemicals on me.

Fixer
Pour in the fixer mix. Agitate continuously for the first 30 seconds and then every couple minutes. I tend to fix for 8-10 minutes. It’s hard to over fix. If the film has a heavy purple tiny, it may need more fixing. You can reuse fixer, so pour it back into your storage container.

Wash
The goal is to get the fixer off the film. You can agitate some our cycle water out. You can take top off and inspect film. No real technique, just make sure all fixer is gone.

Final rinse
Add a couple drops of Photo-Flo and fill with distilled water. Agitate a bit. Both these will make sure no hard water stains develop on the film.

Drying
Pull the film off of the reel, clip one end to where you will be hanging the film to dry. I've tied a bag clip to where we hang clothes to dry. Pull the rest of the film off of the reel and add weight the bottom of the film, with a clothes pin or a film clip. With a damp sponge, ever so gently, remove any water droplets. I slide the sponge down the film, barely touching it. Be careful to not scratch the negatives, they are very soft at this point.

Sunday, May 23, 2010

Zeiss Ikonta 523/2 Reviewed

Background
Folding cameras made by Zeiss Ikon, the camera division of Carl Zeiss, were generally branded Ikonta, Super Ikonta, and Nettar. There are too many models to explain, but each one came in 6x4.5, 6x6, and 6x9 format, and mostly used 120 film. Nettar was the lowest end, then Ikonta, and then Super Ikonta. Super Ikontas had integrated rangefinders. The build construction of the 3 different models were roughly equal, but the lenses and shutters were different. The high end shutter was a Synchro-Compur shutter with a Zeiss Tessar f/3.5 (the focal length varied between 6x6 and 6x9 formats). The low end may be a 4-speed Vario shutter with a Novar f/6.3 lens.

Generally, more speeds on the shutter indicate a better shutter. The wider aperture lens is generally indicative of a better lens, even within the same model. So a f/3.5 Novar is better than the a f/6.3 Novar. Time is also a factor in which model is better. Postwar models had coated lenses and generally the post war lenses were f/4.5 at the most.

This Model
The Zeiss Ikonta 523/2 produces 6x9 (cm) negatives on 120 film. Film is wound by viewing a little number in a red window on the back of the camera. There is no automatic stop which is common for these types of cameras. There is an interlock which prevents double exposure. It folds up nicely and I can fit it into a large pocket without any hassle.

This particular camera has a 105mm f/3.5 Novar lenses. Novar lenses were 3-element lenses made by quality German lens manufacturers such as Rodenstock or Steinheil for Zeiss. Some examples of this model had a higher quality, 4-element, Zeiss Tessar 105 f/3.5 lens. The difference in performance is said to be at wider apertures in the corners. Of course, examples with the Tessar are going to cost about 4 times the price, due to collector interest.

This model lacks a rangefinder, which means I have to focus by guessing. Since I primarily got this camera to take landscapes or cityscapes on vacation, I'd likely keep the focus set at infinity anyway. Since this model has a accessory shoe, I can add an accessory rangefinder.

The Zeiss Ikonta 523/2:


Performance: While it is only 3-element, lens, overall it produces nice photos. It has very sharp centers, but a little blurry in the edges. These samples were taken at f/8 or f/11.

Even a so-so medium format camera is going to likely beat the best a 35mm can offer. The 6x9 negative is about 8 times as big as a 35mm negative. The larger negative is the primary reason to get a folding 6x9 camera. It's the largest negative you'll be able to get without having to hassle with 4x5 sheet film.

Sample photo #1: Tri-X scanned on a Epson V-500.


Highlight of right side. It gets fuzzier towards the edge.


Highlight of Lower right corner


Sample #2


Lower left side. The Hotel Derek sign is sharp, while the Beal Bank sign is a bit fuzzy.


Links

Price List - Post 1950, Zeiss Ikon 120 Folders


Zeiss Ikonta 524/2 Reviewed

Monday, May 17, 2010

The Olympus OM-2n Reviewed

Simply put, this is the camera I'd recommend for anyone who has been using digital for years and is now interested in film photography. While I don't normally use 35mm SLR cameras, it has the right mix of cost, features, usability, size, and performance.

The Olympus OM-2n is a full interchangeable professional SLR system.

Olympus OM-2n with Zuiko (Olympus) 28/3.5 lens:


Cost: You can get a camera and several lenses for under $200, leaving you with plenty of dough for film. Remember 35mm is "full frame" so a 28mm lens is 28mm, not 40mm.

Camera: $60-$100. The slightly older OM-2 may go for $10-$20 less.
Lenses:
50/1.8 = $35
50/1.4 = $60
35/2.8 = $40
28/3.5 = $35
28/2.8 = $45
24/2.8 =$140
80-200 f/4 zoom = $50

3rd party lenses, such as Tokina, Sigma, or Vivitar can be decent performers for 25%-50% of the Olympus price. I'd definitely consider them for telephoto zoom lenses as it is easier to design a telephoto lens than a wide angle. Manufacturer brand lenses tend to perform better at wider angles and wider apertures. So a 24mm Olympus will likely be better than a 24mm 3rd party lens. With the 3rd party lens, straight lines may have curvature to them. The difference between an Olympus 50/1.4 and a 3rd party 50/1.4 is at wider apertures. At f/1.4 the 3rd party lens may not be as sharp: possibly less sharp in the center, but mostly likely less sharp in the corners. This is fine for portraits since that will be out of focus anyway. At f/8 or f/16 the lenses will perform the same.

Usability: The camera has two basic settings, Auto and Manual. Auto is aperture priority - you pick the aperture and the camera will pick the shutter speed. This allows for fast shooting in normal light settings. There is also a dial for exposure compensation to adjust for when lighting may fool the light meter. The manual mode allows full control of camera settings. There is a meter that will tell you if you are underexposing or overexposing the image.

A big advantage over other cameras is that the OM-2 and OM-2n take the 1.5 V SR-44 silver oxide battery which is commonly available. Many other cameras of that era may take a 1.35V mercury battery which is no longer available and substitute batteries (Wein Cell) are annoying. Remember to use the SR-44 instead of the LR-44 alkaline battery. They are the same size and some will tell you they are the same, but as the LR-44 depletes, the voltage drops. As the voltage drops, the meter will underexpose shots. The SR-44 will just die.

Dead batteries? With electronically controlled shutters (as the OM-2n is), a dead battery may mean a dead camera. This is not quite the case with the OM-2n as it has mechanical ability to fire at 1/60 shutter speed.


Size: The Olympus OM series was modeled after the Leica M series. Leica Ms still smaller because are they are rangefinders and don't have a mirror box, but the Olympus is notable smaller than competing SLRs.

Leica M with 50/2 Summicron versus Olympus OM-2n with 28/3.5 lens:


Other:
  • Zuiko is Olympus's brand of lenses and is very highly regarded.
  • The OM-1 are purely mechanical cameras with a build in meter, meaning the camera operations don't required a battery. The battery is needed for the meter and this is the dreaded 1.35V mercury battery for the meter.
  • The difference between the OM-2 and the OM-2n is small and has features you'd probably never use. The OM-2n are newer so they may be in better shape with 27 year old electronic instead of 33 year old electronics.
  • The OM-10 and OM-20 were consumer grade SLR cameras. They have aperture priority only (no manual mode). Since the OM-2 is so inexpensive today, there really isn't a reason to get the OM-10. Remember, the OM-2 was designed for professionals.

Tuesday, May 11, 2010

Developing Really Old Film

I came across this exposed film in an old Kodak Tourist II camera at my in-laws. All it says is "panchromatic film" so I don't know the speed.

The camera model was introduced in 1951. I'm guessing the film is somewhere from the late 50s. I was going to give it a go at developing it. I have either D-76 or HC-110, but all things being equal, going to try D-76 1:1 since I have some stock mixed.

However, I am unsure about the time. B&W film was probably around ASA 100 back then, but there is likely some loss of speed, requiring extra time.

I've tried looking at some manufacturer developing times for modern film to try to find an equivalent, but there is little consistency between speed an developing time. For D76 1:1 at 68F are Efke 100 and Tri-X 400 are both 10 minutes, while HP5 is 13 minutes.

Since Efke is an "old film", Efke may be a closer emulsion to what I am developing and considering the age, I was going to try 13 minutes. I'll update with results.


The Results: Not good. The emulsion disintegrated in several spots. The best image is a faint outline of a few people.


Sunday, May 9, 2010

Film Versus Digital

Photography boards are awash with debates on film versus digital. Comparing results, is always more telling. Sometimes, I'll take a digital photo as a backup or if I need instantaneous results. Afterwards, it is interesting to compare results.

Here is the film version. It's Fuji 400H film take with a Leica M3, Summicron DR 50/2 with the close focusing goggles.


Now the digital, A very capable, prosumer, Leica D-Lux 4 with Vario-Summicron lens. The lens equivalent is 24-60mm, but the actual focal length is about 6-12 mm, resulting few instants where you can use depth of field to separate the subject from the background.


The digital photo looks sharp and crisp, but it looks a wee fake. One quote I saw online I think sums it up well: "Digital is like shaved legs on a man - very smooth and clean but there is something acutely disconcerting about it."

It actually looks very similar to the film version but with the contrast digitally jacked way up high.


Update - Another Look:

Film, Fuji 400H taken on a 55 year old Rolleiflex versus an unknown digital P&S. The film version looks natural while the digital's colors look fake. Now I know digital photographers spend a lot of time in photoshop to make digital look like film. Digital seems to be that you are removing a hassle, but are you really just trading one hassle for another?

Film:

Digital:

Thursday, April 22, 2010

Adjusting Infiniti Focus on a Folding Camera

Vintage folding cameras usually have front element focusing. Over time, these may have been moved out of alignment.

The professional way to align the focus at infiniti is to use an autocollimator. There are other ways of aligning the focus using a second SLR as a collimator which is decribed here or here.

What you'll need:--Tiny screwdriver. My 1/16" screwdriver works, but its almost too big. --Magnifying glass or jewelers loupe (optional)
--Tripod (optional)
--Cardboard and Wax paper (or ground glass)

Steps (If you access to a piece of ground glass, you can skip step one.)

1. Wax paper can be used as a temporary substitute for ground glass. Cut a cardboard frame that will fit the base of the film gate. The cardboard provides some rigidity to the wax paper. Cut a piece of wax paper and tape it tightly against the frame.


2. The distance ring is attached through three small set screws. It is not the bigger screw which simply acts a stopping device when turning the focus ring. Unscrew the set screws and remove the distance ring. You can unscrew the front element all the way, but don't.


3. Mount the camera on a tripod. You'll need the camera to point at a faraway object. Place the camera in a shaded area and the subject to be bright so you can see the best. Out a window or and open door works well.

3. Open the back and tape the frame to the film gate.

4. Open the aperture to the widest setting. Open the shutter to "B" or "T".


5. Focus the lens. Use the jeweler's loupe to help determine best accuracy.


6. Replace the focusing ring and tighten the set screws.


Of course, if you have a piece of ground glass, it makes determining focus the easiest. This is a Hasselblad focusing screen


Friday, April 2, 2010

Handmade Graflex

My grandfather built a camera back in the day. In the below picture, it is the one on the left. After doing some research, I found it is copy of a Graflex 2x3 Crown Graphic. It takes sheet film in 2 1/4 x 3 1/4 format.

On the right, is a Graflex Miniature Speed Graphic. The Miniature Speed Graphic has a 11.5cm f/4.5 Carl Zeiss Tessar and the homemade camera has a 12cm f/3.5 Schneider Kreuznach Xenar. The lenses are roughly equal although the faster Xenar probably has a small edge. I got the Miniature Speed Graphic thinking it was the correct copy, but there is a minor difference.


The difference between the Speed Graphic and the Crown Graphic, is the Speed Graphic has a second focal plane shutter. There is also the Century Graphic which is the same as the Crown graphic, but with a plastic body. Many Graflex cameras, both the came with an accessory rangefinder. On the photo on the bottom left, the Miniature Speed Graphic, (looking at the rear right side) the levels and dials along the right for operating the focal plane shutter. The long metal attachment and tube is the rangefinder.

The focal plane shutter is really only needed if you attach a separate lens without its own leaf shutter. Alternatively, if you want a shutter speed faster than 1/250 Compur shutter maximum, then it also may be needed.

'

The front of the cameras look very similar. The Speed Graphic has the rangefinder on the left side and a view finder on top.


The rear of the camera is where you load the sheet film holder. You can focus on the ground glass. The homemade camera is constantly exposed and the Graflex has a hood that pops up.


So is the camera really handmade? My grandfather was a tool and dye maker, so he had the skills and access to the tools. He also had a nack and a talent for making things. The numbers on the distance scale are punched


Notice the machined distance scales on the Speed Graphic.


I haven't tried to use either camera with film yet, although I will soon as I have both 2 1/4" x 3 1/4" film and sheet film holders. Only Efke, a Croatian manufacturer, makes 2 1/4" x 3 1/4" sheet film, in black & white in three speeds - 25, 50, and 100.